


The mobile and in-app advertising space has always been notorious for high levels of ad fraud. Fraudulent traffic has always been costly, but the problem has grown significantly over the years. According to Business of Apps, estimated global losses from ad fraud nearly tripled between 2018 and 2023 — from $35 billion to $100 billion.
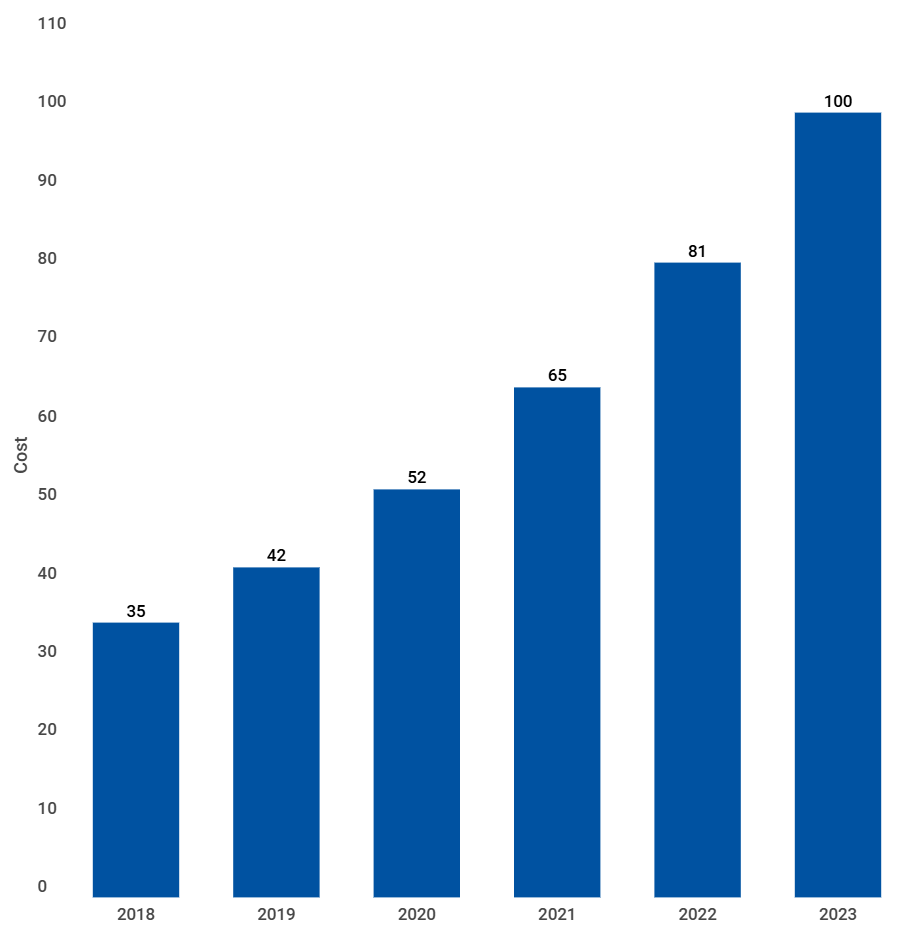
Estimated cost of digital ad fraud worldwide from 2018 to 2023 ($billion)
Teams that don’t take traffic validation seriously risk burning through their budgets and sacrificing profitability. And fraud isn’t the only issue — invalid traffic is another major source of wasted spend. With the right MMP setup, you can significantly reduce both. AppsFlyer offers exactly that through its built-in fraud protection combined with Validation Rules.
In this article, we’ll explain how to configure AppsFlyer to protect your campaigns from fraud and invalid traffic.
How AppsFlyer Protects Against Fraud
AppsFlyer’s fraud prevention system consists of two protection tiers, depending on your subscription plan: Protect Lite and Protect360.
Tier 1 — Protect Lite
Protect Lite is the basic anti-fraud solution available with standard AppsFlyer plans. It detects and blocks suspicious installs, while all fraud-related data is displayed in the dashboard with filtering and grouping options for easier analysis.
However, Protect Lite only analyzes installs before attribution. Suspicious post-install events are outside its scope. Protect360, on the other hand, detects both fraudulent installs and post-install events before and after attribution.
Tier 2 — Protect360
Protect360 is AppsFlyer’s advanced anti-fraud solution available on premium plans. It relies on AI and machine learning models capable of identifying sophisticated fraud patterns that are difficult to detect manually.
According to AppsFlyer, Protect360 can identify the following types of fraud:
- Continuous device ID resets used to generate fake installs;
- Install and click hijacking via malicious software;
- Click spamming aimed at stealing attribution;
- Abnormal user behavior after app installation;
- Traffic from suspicious or compromised IP addresses;
- SDK spoofing that fakes installs, deposits, and other in-app events.
In addition to standard fraud patterns, Protect360 also analyzes behavioral signals. It can even be configured to run in monitoring mode, allowing advertisers to collect data and train the detection models before enabling automatic blocking for stronger long-term protection.
How Validation Rules Solve the Invalid Traffic Problem
Even if you’re using Protect360, which catches most fraudulent traffic, you’ll still pay for invalid traffic that doesn’t technically qualify as fraud. This is where Validation Rules come in.
Validation Rules are a set of custom conditions configured manually by the media buyer. If Protect Lite or Protect360 finds no signs of fraud, the traffic is then evaluated against your Validation Rules.
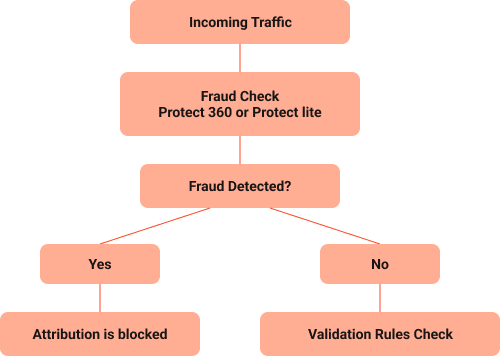
In other words, the system checks whether incoming traffic matches the criteria you’ve defined.
Example: you’re running a campaign targeting Spain. From a technical perspective, the installs and post-install events appear legitimate, so Protect360 doesn’t flag them. However, the traffic actually comes from India. Since no fraud signals were detected, you’d normally end up paying for those installs.
If you’ve configured a Validation Rule to allow traffic only from Spain, those invalid installs from India will be rejected automatically.
Which Parameters Are Available in Validation Rules
GEO and other basic parameters are not the only filters available in Validation Rules. According to the official AppsFlyer documentation, the following parameters can be configured.
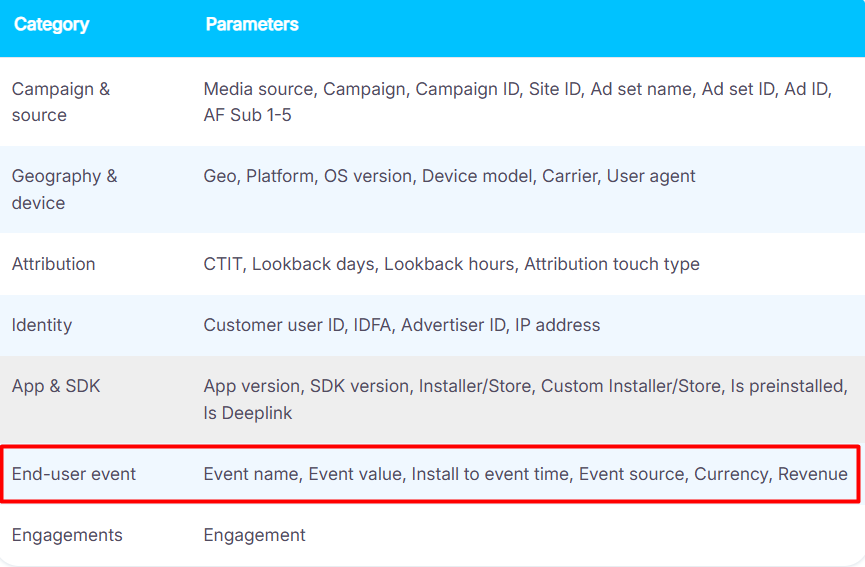
As shown in the screenshot, traffic can be filtered by engagement, the presence or absence of a deep link, click-to-install time, and many other criteria.
Pay special attention to the “End-user event” section, which contains parameters for filtering invalid post-install events. For example, the “Event name” parameter allows you to filter traffic based on specific events. You can configure the rules so that only deposits are counted, while all other events are ignored.
The available rule set is quite extensive. You can combine different parameters to fit various campaign types, including CPI, App Events, and retargeting campaigns.
How to Configure Validation Rules in AppsFlyer
Setting up Validation Rules begins by selecting the app — whether it’s from an app store, a standalone APK, or a PWA. After that, you can move on to the technical configuration.
Step 1: Select the Traffic Source
According to the AppsFlyer documentation, there are three ways to choose which traffic sources the Validation Rules will apply to:
- Filter all traffic, including organic traffic;
- Filter all paid traffic while excluding organic traffic;
- Filter selected paid traffic sources.
The third option allows you to apply the rules only to a specific traffic source, such as Bigo, Unity, Mintegral, or any other source.
Step 2: Configure the Rules
Validation Rules work like a constructor. A media buyer can apply a single rule from the table below or combine multiple rules at the same time.
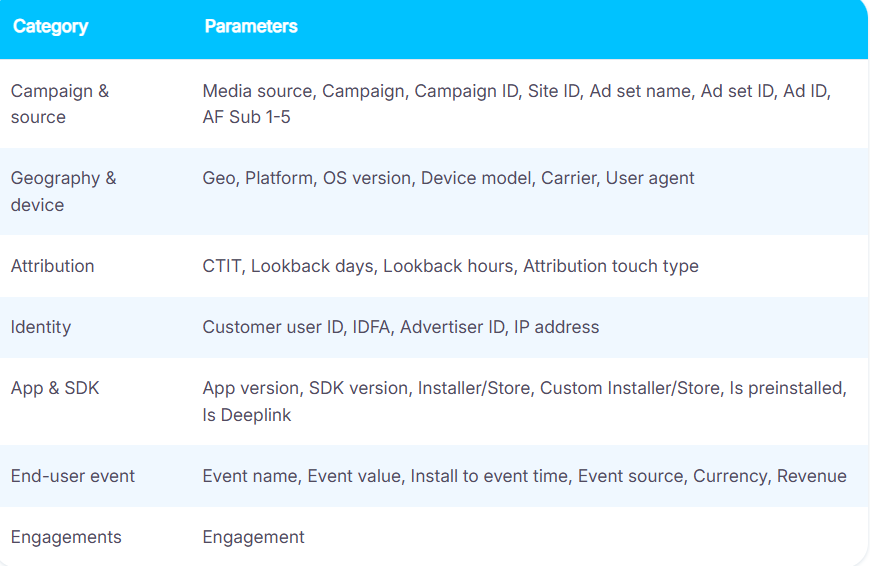
The platform provides two matching options:
- Match conditions — the action is applied only to events that meet the specified condition;
- Non-match conditions — the action is applied only to events that do not meet the specified condition.
To make this clearer, let’s look at a specific example. We’ll select the “Platform” parameter and set its value to iOS.
| Parameter | Value | Match | Non-match |
| Platform | iOS | Installs from iPhones are blocked, while installs from Android devices are attributed. | Installs from Android devices are blocked, while installs from iPhones are attributed. |
For some parameters, you’re not limited to a single exact value.
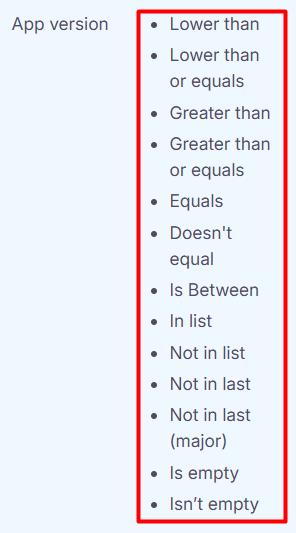
For example, the “App version” parameter supports conditions such as Less than, Greater than or equal to, Within range, and others. Overall, the platform offers a high level of flexibility when configuring validation rules.
Stage 3: Choose the Action
Next, you need to choose the action to apply. The available options depend on the stage of the funnel:
- Installs: mark the install as invalid or reattribute it to the previous traffic source that was not affected by the Validation Rules.
- Post-install events: block attribution while displaying the event in the Protect360 report, or remove all information about the event from the platform.
⚠️ Important: Don’t rush to ignore the softer options, such as reattribution to the previous source or blocking attribution while preserving the data in reports. These options are designed to help you collect enough data, fine-tune your Validation Rules, and minimize false positives over time—provided you thoroughly analyze the statistics and build accurate hypotheses.
After that, all that’s left is to launch the campaign and periodically monitor the statistics. Whenever Validation Rules detect an invalid action, AppsFlyer will automatically send a rejection postback to the advertising network.
3 Less Obvious Things You Should Know About Validation Rules
At first glance, Validation Rules may seem very straightforward, making invalid traffic appear to be a solved problem once and for all. However, there are three less obvious nuances: one will help you get the most out of the tool, while the other two introduce certain limitations.
Tagged Mode. Using softer filtering actions isn’t the only way to avoid false positives. Validation Rules also include a testing mode called Tagged Mode.
In this mode, installs and post-install events that match your Validation Rules are simply tagged with special labels instead of being blocked. Attribution continues as usual.
Clicks cannot be blocked. Validation Rules are designed to filter invalid installs and post-install events—they do not work at the click level. In theory, fraudulent clicks are handled by Protect360. If fraudsters manage to bypass its anti-fraud mechanisms, you’ll still end up paying for those clicks.
Some settings require Protect360. Access to Protect360 is available only with a premium subscription. If you decide to save money and stick with Protect Lite, you’ll not only get a more limited anti-fraud solution but also a reduced set of Validation Rules.
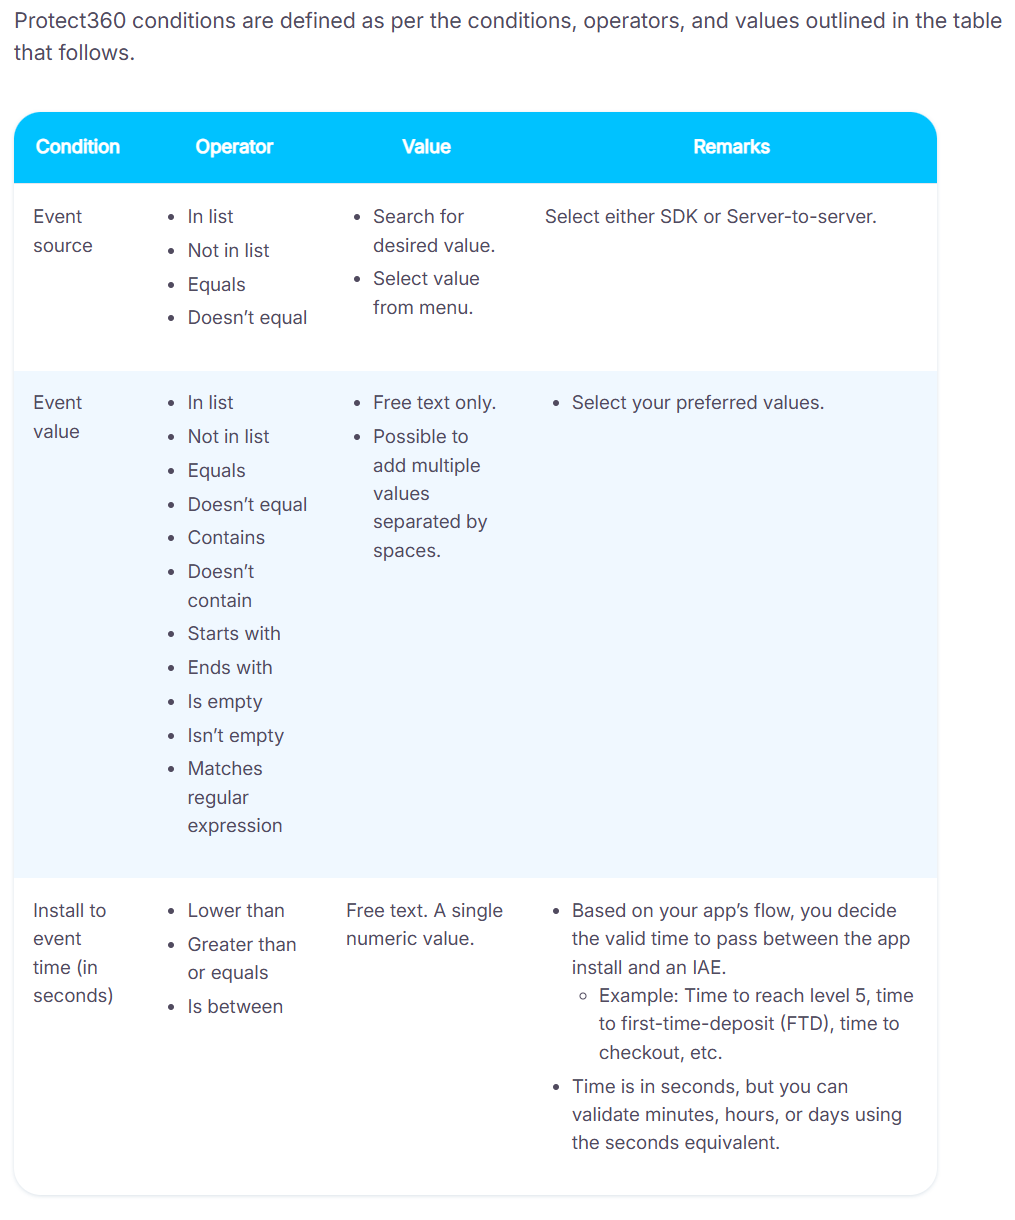
AppsFlyer’s official Validation Rules documentation explicitly states that Protect360 customers receive access to an extended feature set. Without a premium subscription, you won’t be able to filter traffic by campaign, device type, GEO, platform, currency, and several other parameters.
Conclusion
Validation Rules in AppsFlyer are a powerful tool for filtering invalid mobile traffic. However, to unlock their full potential, you’ll need a premium subscription. This provides access to the advanced Protect360 anti-fraud solution and significantly expands the available filtering options.
AppsFlyer integrates with most major advertising networks, including Unity, Bigo, Kwai, Xiaomi, Mintegral, and many others. If you’re tired of spending limits and other platform restrictions, get in touch with the RentAcc team. We’ll connect you to the advertising network you need as quickly as possible and help you launch and optimize your campaigns.
Go to RentAcc | Telegram Bot | Latest news

RentAcc is a platform for working with Facebook and in-app — ready-made agency accounts and automation. Suitable for solo buyers and teams who value stability, transparency, and a technological approach.
Commission: 4 to 10%
Inside the platform:
— agency accounts for any verticals and GEOs
— free replacements and money-back guarantee
— centralized control of spending
— technical support for launches
— instant notifications in the TG-bot









Sending the message, you agree to follow by the terms of our. Privacy policy.